Problems · No pins · Stalled
Gourmet Mushroom Pinning Problems: A Practical Fix
“Is this normal? Still no pins.”
“Is this normal?” is the second most common panic after green mold. Many kits simply need time and moisture at the cut — not a funeral.
Fix mushroom pinning problems on gourmet kits: diagnose no pins, stalled pins, and dry yellow pins with a humidity-first routine.
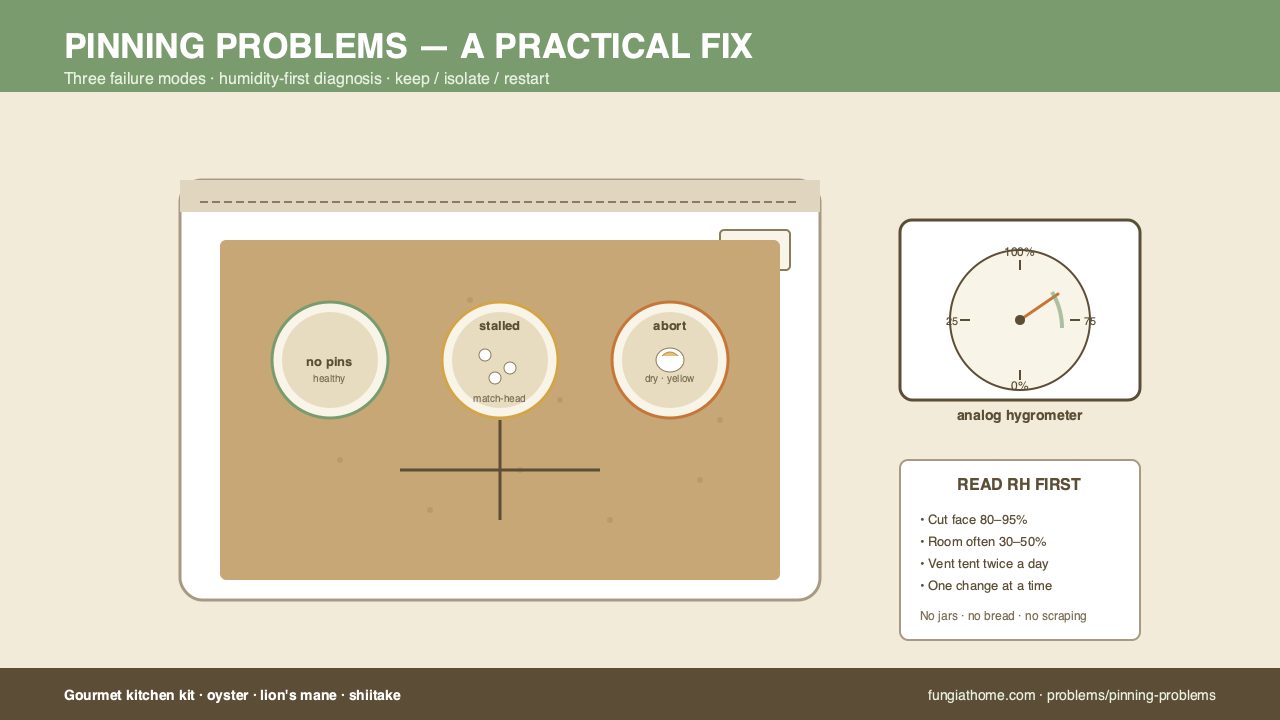
“Is this normal?” is the second most common panic after green mold. Most kits don’t need a rescue — they need a calmer humidity-first routine, a few minutes of fresh air, and one more week of patience.
“Is this normal? Still no pins.”
Do this first
Check whether the cut face is dry or cracked. If yes, fix humidity first (a fine mist or a simple tent) before you assume the kit is dead. Look at the kit, not the calendar. See humidity tools for the small set of items that earn their keep across many cycles.
Quick answer
No pins in the first few days is often normal. Past the typical window — roughly one to two weeks for many oyster kits, longer for lion’s mane and shiitake — humidity, temperature stability, and fresh air are the three levers that actually move pin formation. Before you restart the kit, check those three in order. Don’t spray, scrape, or cut the block.
Step manual: how grow kits work. Species timing differs — oyster is usually the fastest to pin and the most forgiving when humidity slips.
The three failure modes
Most pinning problems fall into one of three patterns. You can spot them by reading the cut face and the room, not by counting days.

- No pins yet, block looks clean. White mycelium, neutral smell, no growth you can see. This is the most common “problem” — it’s usually just timing. Oyster kits commonly show first pins between days 5 and 14. Lion’s mane and shiitake can take longer. Your job is to keep the cut face damp and the room conditions stable until the kit catches up.
- Pins formed, then stalled or aborted. You saw tiny bumps, and they stopped growing. This is almost always a humidity swing or a draft. The cut face dries between misting cycles, the pins harden, and the kit goes back to conserving moisture. Add a tent, shorten the misting interval, and keep the kit away from vents and direct sun.
- Pins turning yellow or brown at the tips. The block is still white and the smell is neutral, but the pin tips are discolored. Yellow or brown tips are usually a drying signal — sometimes a heat signal. Move the kit off a warm counter, add a gentle fan for air exchange, and mist more often. If the discoloration is paired with a colored expanding patch or a sour smell, this is contamination, not a pinning problem — route to the contamination overview instead.
Read the cut face before you change anything
The cut face tells you what to do next. Get down to kit level, use daylight, and look at the same patch twice a day for two days.

- Glossy or pooled. Too wet. Skip the next mist and let the surface return to damp. Pooled water on a kit is the most common mistake beginners make because it looks like “doing something.”
- Dry to the touch, especially at the edges. Too dry. Mist more often, or add a loose humidity tent. The first thing to dry is the edge of the cut, not the middle.
- Cracked or pulling away from the bag. Long-term drying. The block has been losing moisture for days. A humidity dome is the fastest fix here; a humidifier in the room works if you already have one.
- White fluff near the cut. Almost always healthy mycelium recovering from misting. Don’t scrape it. If it grows fast and looks like cobwebs crossing open air, route to the contamination overview instead.
Read the room, not just the kit
A kit only fails if the room lets it fail. Most kitchens run drier than people think — especially in winter with heating on, or in summer with the AC running. A small hygrometer with a probe on the shelf next to the kit is the cheapest diagnostic tool in this whole hobby.

- Room humidity (RH) below ~55%. Most gourmet blocks will struggle to pin in this range. Add a humidity tent or a small humidifier in the room.
- Room humidity 55–75%. The sweet spot for most oyster pins. Watch the cut face daily for the first signs of drying.
- Room humidity above 80%. The cut face may stay damp without misting, but you also need air exchange. Stale wet air stalls pins as fast as dry air.
- Temperature swings more than 5°F across a day. Move the kit to a more stable corner. Heat vents, exterior walls, and sunny counters are the usual culprits.
Why pins fail (kitchen causes)
The kit maker did the hard work in a clean lab. Your job during the kitchen phase is to not undo it. The same small list of causes shows up over and over:
- Drying drafts. Heating vents, AC vents, a window that opens a few times a day, or a kitchen fan. The cut face dries faster than the rest of the block, and the kit aborts pin formation to conserve moisture.
- Static dry air. A room that reads 35% RH will pin nothing. The block has water, but it loses it faster than the mycelium can use it. A mini hygrometer on the shelf tells you this in five seconds.
- Over-misting into puddles. Standing water on the fruiting surface is the other common failure. It stalls pins, softens healthy tissue, and gives mold spores a place to start.
- Cold corners. A basement shelf that drops below 60°F overnight can slow pin formation past the normal window. Move the kit up a shelf or into a warmer room.
- Hot corners. A counter above a dishwasher or next to a toaster can cook the cut face. Pins abort fast when the surface temperature pushes past the kit’s comfort range.
- No fresh air. A tent that stays closed for days will keep humidity up but starve the kit of oxygen. Pins need gas exchange. Open the tent twice a day for a few minutes, or add a small fan pointed at the wall nearby.

You don’t need a fruiting chamber brand name. You need dew on the cut face, soft indirect light, a stable mid-room temperature, and some air movement. A USB clip-on fan pointed at a wall a few feet away gives the gentle air exchange a kit needs without drying the surface.
Keep, watch, or restart
This is the decision tree. Don’t restart a kit on day 10 just because the calendar worries you. Read the kit, not the internet.

- Keep watching. White block, neutral smell, no pins yet, under two weeks past opening. Add a small humidifier or a humidity tent, shorten the misting interval, and recheck the cut face in 48 hours. Don’t change everything at once.
- Adjust humidity and air. Pins formed but stalled, or yellow tips on an otherwise clean block. Move the kit to a more stable spot, add a humidity dome, open the dome twice a day for fresh air, and mist with a fine spray bottle when the cut face returns to damp rather than wet.
- Restart the kit. Two contamination signals agree — color and smell, or fast spread and a colored patch — and the kit is past the point where a humidity fix would help. Bag the whole sealed unit, wipe the shelf with a 70% alcohol cloth, and open a fresh oyster kit in the cleaned zone.
If you’re past four weeks with no growth and the kit still looks clean, the maker’s fruiting block may simply be a slow one. Most ready-to-fruit kits will fruit by then, but a few take longer. Read the maker’s instructions on the label before calling it.

Kits vs bags
Kits are easier to re-wet at a small face cut. They’re the right tool for one fruiting block at a time, and the decision tree above applies to them directly. A lost kit is a $30 lesson, not a $200 one.
Grow bags are bigger, fruit longer, and ask more from you. A stalled bag is harder to recover because the cut surface is larger and the humidity moves are bigger. If you haven’t successfully finished a kit harvest yet, don’t move to bags just because pins stalled once. Start with a kit, mist through it, and graduate to bags only after you’ve earned that step.
For the full kit-to-harvest walk, see how grow kits work. The bag path is documented at grow bags after your first kit.

What you might need
These are the kitchen-scale items that earn their keep across many cycles, not single-use fixes. Use them on the shelf, the cut face, and the air around the kit.
- 2-pack mini digital hygrometer with probe — small enough to sit on a shelf next to the kit. The probe lets you read humidity inside a humidity tent without opening it. Useful for diagnosing whether a slow kit is too dry or fine.
- Continuous fine-mist spray bottle (2-pack) — dedicated mister for the cut face. A fine spray evaporates within a minute; a stream pools and rots. Two bottles means one for the kit and one for plain water around the shelf.
- Tabletop humidity dome — clear plastic tent that fits over a single kit. Slows moisture loss when room air is consistently dry. Open it twice a day for fresh air.
- 70% isopropyl alcohol spray (17 oz) — for the shelf and the clip-fan grill between kits. Spray it on a cloth, never on the block. A single bottle covers months of wipe-downs.
- Pink oyster mushroom grow kit — the cleanest restart after a contamination loss. Oyster species are the most forgiving on a kitchen counter and the fastest to pin under good conditions.
- USB clip-on fan — quiet, cord-powered, clips to a shelf. Pointed at a wall a few feet away, it gives the gentle air exchange gourmet blocks need without drying the cut surface.
If you only buy one thing, buy the hygrometer. A blocked cut face tells you one signal; a room reading tells you the cause. If you only buy two, add the spray bottle — most over-misting comes from using the wrong sprayer.
Light and temperature
The other two levers are easier than humidity once you know what you’re looking for.

- Light. Most gourmet kits need a soft day/night light cue. A kitchen counter that gets indirect daylight through a window is enough. Direct sun on the cut face will cook pins in a few hours, so don’t put a kit on a south-facing windowsill.
- Temperature. Most oyster species pin fastest between 60°F and 75°F. Lion’s mane prefers the cooler half of that range. Shiitake likes a slight drop overnight. A room that swings more than 5°F across a day is usually the problem — move the kit to a more stable spot.
If your home is naturally bright or dim, the kit’s expectations are forgiving. Don’t invest in a grow light for a kitchen kit. Don’t put a kit in a dark closet either.
Common mistakes
These are the calls we see most often. Read them once before you start, not after you’ve already sprayed something on the block.
- Misting on a timer instead of by touch. A schedule that mist every six hours will drown a damp block and under-mist a dry one. Mist when the cut face returns to damp rather than wet, and stop when dew is visible.
- Closing the humidity tent and walking away. A closed tent can save a drying kit, but a sealed tent will starve it of fresh air. Open it twice a day for a few minutes.
- Pointing a fan directly at the cut face. Air exchange helps pins form; direct wind dries them out. Point the fan at a wall a few feet away.
- Restarting on day 10. Most oyster kits haven’t fruited by day 10. The decision tree says “watch and adjust” until past the normal window.
- Confusing yellow tips with contamination. Yellow tips on a clean-smelling block are drying, not mold. Route to the contamination guide only when you see a colored patch or a sour smell.
- Over-misting into a small tent. A tent traps moisture. If you add a tent and keep your old misting schedule, you’ll pool water fast. Cut the misting frequency in half when the tent goes on.
Prevent next round
Start misting as soon as you open the kit. Don’t wait for pins to “deserve” humidity. The first three days set the cut face moisture pattern for the whole cycle.

Pick a kit you can actually care for daily. If you travel most weeks, a smaller kit with a humidity dome is easier to manage than a larger one. See how to choose a grow kit for the short decision walk.
Wipe the shelf with a 70% alcohol cloth before opening the next kit. Log the room humidity for a few days with a mini hygrometer; big swings show up here first. When you start the next cycle, give it the same shelf and the same room conditions you used when the last one fruited cleanly.
Key takeaways
- No pins in the first 10 days is usually timing, not a dead kit. Wait, mist, and recheck.
- The three failure modes are no pins, stalled pins, and dry yellow pins. Each has a different fix.
- Read the cut face before you change anything. Glossy = too wet. Cracked = too dry. White fluff = normal.
- A small hygrometer on the shelf tells you the cause in five seconds. Buy one before you buy anything else.
- Air exchange matters as much as humidity. A fan pointed at a wall, not at the cut face.
- Don’t restart on day 10. Restart when two contamination signals agree or when a healthy block has stayed clean and stagnant past six weeks.
Affiliate disclosure: FungiAtHome is a participant in the Amazon Services LLC Associates Program. We earn from qualifying purchases. Recommendations are based on the role each tool plays in the workflow — not paid placements.
Culinary / edible kitchen growing only. FungiAtHome does not cover psychedelic or actives cultivation.
Related guides
Back to problems . Affiliate disclosure . Culinary / edible kitchen growing only. admin@fungiathome.com