Problems · Green patches
Green Mold on a Gourmet Mushroom Kit — Trichoderma
“It turned green.”
Green on a kit is the classic panic moment. This guide helps you separate bruising or lighting tricks from expanding mold, then decide isolate or toss — without scraping spores around the kitchen.
Green mold on a gourmet mushroom kit: how to identify Trichoderma, rule out lookalikes, and decide keep, isolate, or discard for kitchen kits and bags.
Green on a kit is the classic panic moment. This guide helps you separate bruising or lighting tricks from expanding mold, then decide isolate or toss — without scraping spores around the kitchen.
Affiliate disclosure: As an Amazon Associate, FungiAtHome may earn a commission from qualifying purchases made through links on this page.
“It turned green.”
Do this first
Isolate the kit away from other bags and food prep. Do not scrape green patches. Keep it bagged while you read. Do not open it over prep surfaces, and wipe the shelf with 70% alcohol before any other kit touches that spot.
Quick answer
Expanding green or blue-green powdery patches on substrate or fruit are often mold (commonly Trichoderma). For most kitchen ready-to-fruit kits, once green mold is established, discard the kit rather than “cut it out and hope.”
If you’re still unsure if it is green mold vs something else, start at Contamination overview and use the contamination checker for a side-by-side walkthrough. The kitchen rule is simple: isolate first, photograph in daylight, then decide.
What green mold looks like vs lookalikes
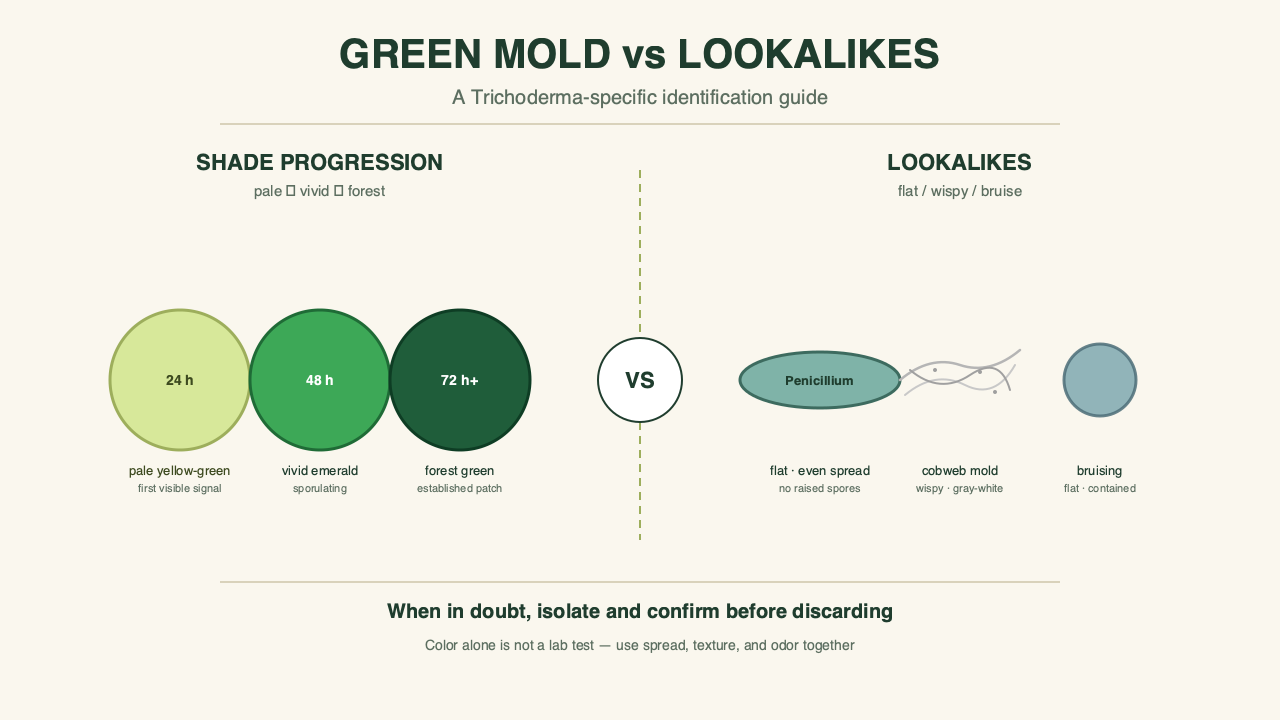
Green patches on a kit are not all the same thing. Color alone is not a lab diagnosis — texture, location, and rate of change matter more. Most “green” scares on kitchen kits fall into one of four buckets: Trichoderma, Penicillium, bruising, or lighting tricks. Here’s how to tell them apart before you make a discard call.

Trichoderma vs bruising
Trichoderma sits on top of the substrate. It looks powdery, has a white leading edge as it spreads, and keeps moving under normal kitchen conditions. Bruising is flat — it lives inside the mycelium where the block was pressed, scraped, or hit during shipping, and it does not spread. The fastest recheck is a daylight photo at the same angle an hour later. If the patch is bigger or whiter at the edge, it is not bruising.
Bruising on some oyster fruit bodies can also look bluish when squeezed. That’s normal — the fruit tissue bruises like an apple — and it does not mean the block underneath is contaminated. Handle the fruit, don’t handle the block, and don’t pour anything on it.

Trichoderma vs Penicillium
Penicillium is also green, but it usually shows up as a secondary invader on an already-stressed block rather than the first mover. Both are higher-concern colors; you do not need to ID the exact species to make the kitchen decision. Run the keep/isolate/discard tree based on whether the patch is expanding and whether the block smells normal.
Trichoderma vs cobweb
Cobweb mold (Dactylium) is gray-white and wispy — loose strands crossing open air above the block. It grows fast. Trichoderma is green to blue-green and powdery, anchored to the substrate. White cobweb on top of green Trichoderma can happen late in the cycle, but at that point the kit is already a discard. Don’t try to differentiate; just isolate.

Lighting and wet areas
Wet mycelium under warm room light can look greenish or yellowish even when nothing is wrong. Wipe the outside of the bag dry, photograph in daylight without a flash, and compare the same spot across two days. Lighting tricks don’t grow; mold does. If the color stays the same size and shape across photos, you almost certainly do not have Trichoderma.
Still not sure? Wipe the outside of the bag, retake the photo, and let it sit isolated for 24 hours. If the patch has grown under isolation, handle it as contamination. If it’s flat and unchanged, it’s probably bruising or lighting.
Why it happens
Ready-to-fruit kits are clean when they leave the lab, but the moment you cut the bag open you’ve given wild spores an entry. You don’t need a sterile kitchen — you need to avoid the conditions that let competitors win. A few common reasons green mold shows up on a colonized block:
- Wet pooling on the cut face. Over-misting or letting water sit on the opening turns the cut surface into a mold nursery. Fine dew, never a puddle.
- High ambient mold load. A kitchen next to a compost bin, fruit bowl, or damp basement corner pushes more spores toward the kit. Move the kit to a drier shelf with airflow.
- Dirty tools or hands. Unwashed scissors and fingers carry spores from your last grocery trip straight onto the cut surface. Wipe tools with 70% alcohol before they touch the kit.
- Temperature drift. A room that swings hot then cold stresses the mycelium and lets competitors take hold. Most gourmet kits do best around 60–72°F.
- Humidity swings. Drying out invites stress; over-humidifying invites mold. A simple mini hygrometer on the shelf tells you what your room is actually doing, not what it feels like.
- Smothered filter patches. A taped-over filter or a sealed bag without fresh air lets anaerobic bacteria win. Don’t tape over filter discs.
You don’t need a flow hood or a lab to grow clean kits. You need a stable corner, modest misting, basic hand cleanliness, and a willingness to isolate at the first colored patch. For more on kit handling from open to harvest, see how grow kits work and the fruiting conditions reference.
Keep, isolate, or discard
This is the decision tree. Read the kit, not the internet.
- Isolate if the suspect sign is colored (green, blue-green, black, pink) or paired with a sour or rotten smell. Move the kit to a separate shelf, away from other kits and food prep, and don’t open it. Wipe the shelf where it sat with a 70% alcohol cloth before placing the next kit there.
- Keep if the kit looks like healthy white mycelium, smells neutral, and just needs time, humidity, or fresh air. Pinning problems route to the pinning problems guide, not here.
- Discard if the suspect sign is expanding across photos taken 24 hours apart, if the smell is strong and off, or if multiple high-concern signals agree (color + smell, or color + texture). Bag the whole sealed unit and take it out with the trash; don’t cut the block.
If you’re unsure between keep and discard, the kitchen rule is to isolate first. Recheck with a daylight photo 24 hours later and re-run the tree. A patch that visibly grows under isolation is a discard signal, not a salvage candidate — that’s how fast Trichoderma moves on a colonized gourmet block.

Two high-concern signals together — green patch plus sour smell, green patch plus expanding under isolation, or green patch plus cobweb growth on top — almost always means discard. One signal alone is isolate-and-watch. Zero signals is keep and check tomorrow.
If you only see tiny spots and the borderline cases confuse you, isolate and prefer discard for kitchen food-safety peace of mind. Most beginners err on the side of tossing a $25 kit and being glad they did.
Kit vs bags
Kitchen ready-to-fruit kits are sealed blocks designed for one or two harvests. Grow bags are larger spawn or substrate bags designed for growers who’ve already had a successful first kit. The keep/isolate/discard logic is the same for both: don’t scrape, don’t cut, don’t vent indoors, isolate and discard the whole sealed unit if the signal is clearly contamination.
Kits: one block loss is common. Replace after cleaning the area with a wipe-down and a fresh 70% alcohol pass on the shelf. Bags: more material investment, same kitchen rule — don’t vent green mold indoors. After cleanup, return to solid kit habits before scaling grow bags.

If you haven’t done a kit yet, start there. Kits are cheaper, smaller, and easier to isolate than a 5-pound bag. See first grow kit for the beginner path.
Common mistakes
Most green mold scares on kitchen kits come from one of these five moves. Skip them.
- Scraping or cutting the patch out. This is the number one kitchen mistake. Spores go into the air, the knife carries them to the next kit, and the colony underneath the surface keeps growing. Bag the whole unit instead.
- Spraying bleach, peroxide, or random fungicides on the block. None of these reliably reverse established mold, and they leave residues you don’t want on food. Isolate and decide, don’t douse.
- Continuing to mist a clearly contaminated block. More water feeds the competitor culture. Stop misting once the keep/isolate/discard tree points to discard; just bag it.
- Reusing the same still-air shelf corner. If the last kit failed there, the next one probably will too. Wipe the shelf with 70% alcohol, move the kit to a spot with gentle airflow, and check the room humidity for a week before opening the next one.
- Harvesting “from the clean side” of a contaminated block. The mycelium is one connected organism — there is no clean side. Bag the whole sealed unit.
A borderline signal that grows under isolation is not borderline anymore. Trust the photo recheck.
What you might need
A few items make the isolate-and-decide workflow much smoother. You don’t need to buy anything before the kit greens — these are restock items for the next round, not rescue gear for a contaminated block. Fixing humidity supports fruiting; it does not reliably reverse established mold growth.
- 70% isopropyl alcohol spray for wiping the shelf, scissors, and any surface the kit touched before you moved it. Cheap and fast — don’t reach for stronger chemicals.
- Fine-mist spray bottles for the next kit. A continuous-mist bottle gives you dew, not a puddle, which is the difference between healthy mycelium and a mold nursery.
- Mini digital hygrometer to log the room humidity for a week before you open the next kit. Drift in your room explains a lot of repeat failures.
- Clean ready-to-fruit oyster grow kit for the restart. Oyster is forgiving for first-time growers and recovers from small mistakes. See oyster growing guide for the species path.
If you haven’t picked your next kit yet, see how to choose a grow kit for the decision matrix. The kit is the unit you isolate or discard — picking a smaller, sealed block keeps the discard call cheap if things go sideways.
Prevention next time
Most green mold scares are preventable with a stable corner and modest misting. Five habits that lower the odds on the next kit:
- Fine mist only. Hold the bottle 12–18 inches away and aim above the cut, not into it. A puddle on the cut face is the most common mold invitation. Use a continuous-mist spray bottle — a hardware-store plant mister works fine too.
- Keep cuts modest. A small X-cut (about 1.5 inches) is usually enough. Larger openings dry out faster and invite more spores.
- Stable humidity, not maximum humidity. Most gourmet kits do well in the 80–95% RH range at the cut face. A mini hygrometer on the shelf takes the guessing out of it. Fixing humidity supports fruiting; it does not reliably reverse established mold growth.
- Gentle airflow. A still-air corner traps spores. A small clip fan on low, pointed away from the kit, is enough for most kitchens. See humidity and misting tools for fan and tent setups.
- Clean shelf, clean tools, clean hands. Wipe the shelf with 70% alcohol before each new kit. Wipe scissors before each cut. Wash hands before handling the kit.
- Avoid stacking damp cardboard and produce next to kits. Cardboard boxes, fruit bowls, and onion bags are all spore sources. Move them to a different shelf.
After a loss, wipe the zone, open the next kit the right way, and pick a forgiving species — oyster is the typical restart: oyster guide. Don’t reuse the same shelf corner with the same still air if it failed last time. A small change of placement saves more kits than any rescue spray.
Related
- Contamination overview — symptom map for green, black, pink, and cobweb on kitchen kits
- Pinning problems — when the kit looks healthy but won’t fruit
- How grow kits work — open, mist, harvest, second flush
- Fruiting conditions — humidity, light, fresh air at the cut face
- Grow bags — the upgrade path after your first kit
- Oyster growing guide — the forgiving restart species
- How to choose a grow kit — decision matrix for the next kit
- Humidity and misting tools — fan, tent, hygrometer roles
Key takeaways
- Expanding green or blue-green powdery patches on a colonized kit are usually Trichoderma; isolate immediately and decide keep or discard.
- Bruising is flat, contained, and doesn’t grow; Trichoderma is powdery, sits on top of the substrate, and expands within 24–48 hours under normal kitchen conditions.
- Don’t scrape, cut, or pour chemicals on the block. Bag the whole sealed unit and discard if the signal is clearly contamination.
- For kitchen ready-to-fruit kits, the discard branch is the safe call once green mold is established. The block is one connected organism — there is no “clean side.”
- After a loss, wipe the shelf with 70% alcohol, move the kit to a spot with gentle airflow, and restart with a sealed ready-to-fruit oyster kit.
Culinary / edible kitchen growing only. FungiAtHome does not cover psychedelic or actives cultivation.
Related guides
Back to problems . Affiliate disclosure . Culinary / edible kitchen growing only. admin@fungiathome.com